 Tim Mosenfelder/Getty Images
Big, beautiful brows have really grown on us...literally.
Seeing Cara Delevingne, Lauren Conrad and Jennifer Lopez's eyebrow transformations has been a real eye opener.
It seems like a lot of beauty brands have been churning out brow products to meet the growing demand, while many consumers are willing to spend more money and time to get the perfect shape.
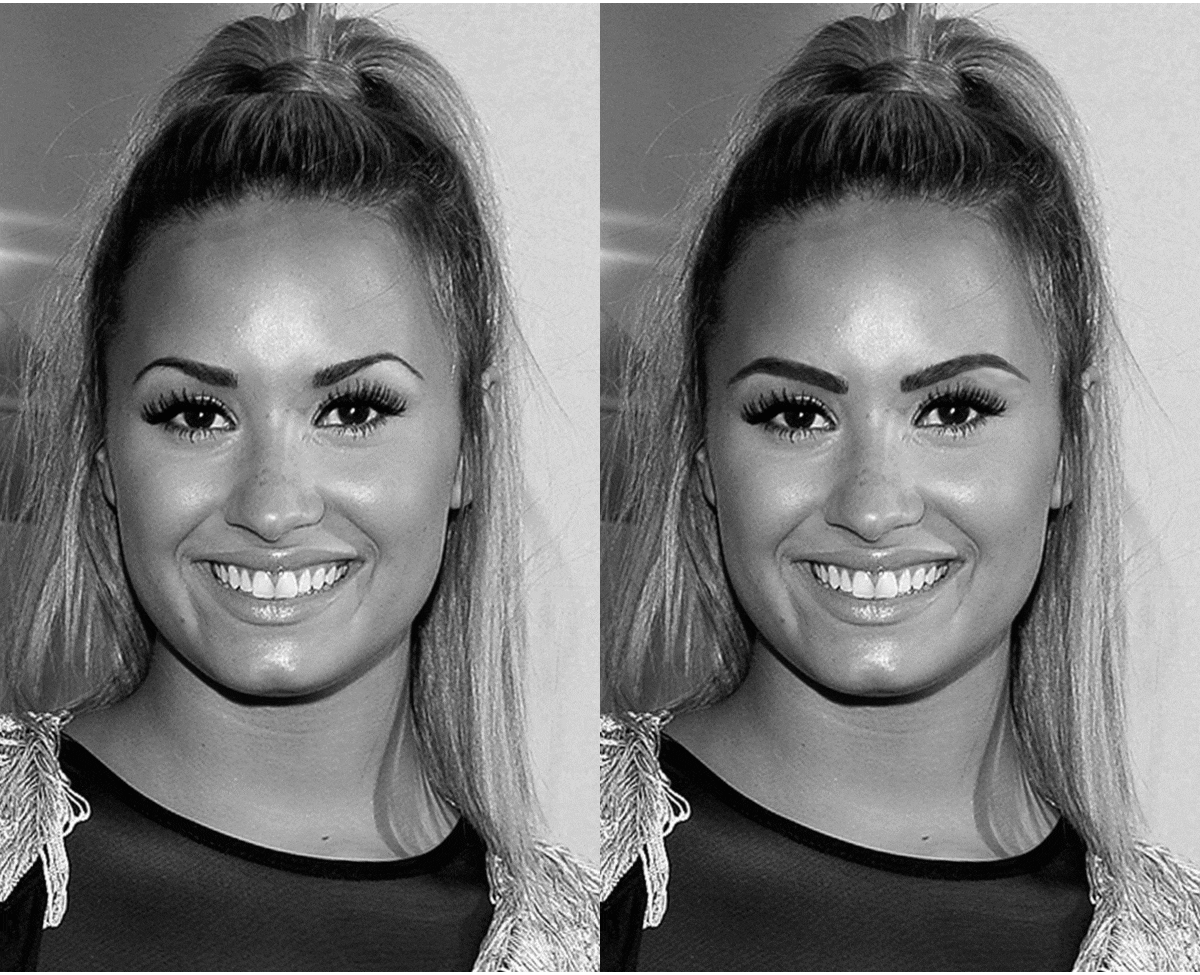
But for those of you with more shallow pockets or could use just a few more suggestions, tips and tricks, we offer you just that. Using an image of Demi Lovato circa Season Two of The X Factor, we demonstrate how placement and a balanced eyebrow can transform a face.
The function of eyebrows is to prevent sweat and debris from getting into the eye. They are also important for communicating our facial expressions. Aesthetically, they frame the face.
For the most part, the starting points of the brow should at least hover over the tear duct and align with the center of the nostrils and Cupid's bow. It's all about balancing and harmonizing with the rest of the face.
When your starting points are too far apart, it gives the illusion of the face expanding. When one brow is on point and the other is out in left field, it can throw off the balance of the face. Season Two Demi's brows could benefit from some growing or being filled in closer toward the nose.
Step 1: Find the brows' alignment with a pencil. Hold it up in front of the nose to where the pencil aligns with the center of the nostrils and the high points of the Cupid's bow.
Don't worry if it's all not perfect—everyone's face is different. These are just guidelines to help get you on the right track.
Now take your brow product and meet your brows' current bottom starting point and simply sketch or lightly swipe a line toward the nose, continuing at the angle of your natural brow. Repeat this step with the top part of the brow so that the two lines are parallel.
Softly fill in the sparse parts in between the lines. Blend with a brow brush.
Usually when a face is at rest, an eyebrow arch is the highest point of the eyebrow. If it's not, you may want to re-think your brow.
When the starting brow points are higher than the arch it can give off a worried look. If the middle part of the brow is at the highest point, it might be because the brow is too rounded, which can sometimes give off a surprised look, a 1920s makeup look or be reminiscent of clown makeup—and that's no joke.
Demi's top brow is headed in the right direction; it just stops a little short of completing the frame.
Step 2: From the center of the nose, align the pencil through the iris and on to where the brow would be if there were hair there. If your arch point meets the pencil then awesome! If not or if you want it more defined, take your brow product and sketch in the continuation of the brow out to meet that point.
The tail of the eyebrow can be tricky as it, for the most part, naturally sparse. The brow tails are the sides of the frame. If they go too in toward the eye, they can close off the face, give the illusion of sagging or mimic how the brow looks when the eyes are hard-core squinting
If tails are too far out, it can get pretty Spock-esque or look like a face-lift gone eschew.
Step 3: To find your brow tail, align the pencil at the nose with the eye's lower water line until the tip lines up under the point we found in Step 2. Start sketching in rounded strokes between the points. Avoid just drawing a line; this could make the brows look really severe. Then blend out with a brow brush.
Step 4: Now let's focus on how they align with each other so that they're less sisters and more twins. Take your pencil and line up the top and bottom start points with the opposite brow. If they meet, great! In Demi's photo, her top points met, but her bottom brow points needed some filling in to meet.
After determining the brows' meeting points, it's time to focus on the lower brow line. Keep the bottom brow line parallel to the top part of the brow line to avoid the dreaded "tad pole" brow. Some think that this is how you carve out an arch, but it just makes for an uneven shape.
Step 5: Align your pencil from under the lower brow point and keep it parallel to the upper brow line. Any "naked" space above the pencil should be sketched in. If there is no hair there at all, feel free to be a bit more liberal with how much color you're applying.
Step 6: Finding your inner brow arch, or the part where the inner brow starts to curve, is as simple as taking your pencil and aligning it from the upper brow arch point to the lower brow line. Here's where the brows' falling action begins.
Step 7: Sketch in smooth, small, circular strokes toward the tail ending point that we determined in Step 3.
The above photo really shows the parts of the brow that were filled in to balance Demi's brows. Always remember that beauty is in the eye of the brow-holder. It's always great to know your brows capabilities and what works best for you.
Demi eventually moved on to bigger and better brows, but we love her either way!